Using the Windows Volume Control Mixer
Last updated on 3/31/2016
By Frank Basile
 Everyone has probably seen the little yellow speaker icon that’s on the Windows Taskbar next to the clock, but for many, this is simply a place to adjust the overall volume of their speakers. When using Cakewalk, and other audio and MIDI programs, using that yellow speaker icon is an important part of the recording process, and understanding it’s capabilities can be essential to becoming an efficient desktop musician, and engineer.
Note: The "Windows Volume Control" may also be referred to as the "Windows Mixer" throughout this article.
Finding the Windows Mixer
If you do not see a yellow speaker icon on your taskbar, it may simply not be set to appear on the taskbar. To show the speaker icon, go to the Control Panel, open the Multimedia properties icon, then select the option "Show volume control on taskbar", and hit OK. If the icon is on your taskbar, but it’s grayed-out so it cannot be accessed, then your sound card may not support the Windows volume controls. Most stereo sound cards will support this utility, but some will not. Some cards will have their own mixer program that was designed to be used only with that particular card, and may or may not be able to use the Windows Mixer. Cards that have multiple inputs and outputs (more than two) will not be able to use the Windows Mixer. If needed, check with the manufacturer of your sound card to confirm whether or not your card supports the Windows Mixer.
Using the Windows Mixer
The Windows Mixer has two main sections to it, the Play Control, and the Record Control.
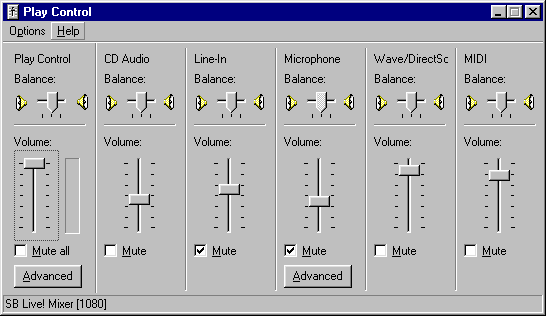
The Play Control, sometimes called Volume Control, is where you set the volume levels when playing back tracks, and also for setting monitoring levels while recording. (We’ll talk a little more about "Monitoring" later). Win 95 users Tip
To open the Play Control, double-click on the yellow speaker icon.
Note: You can also open the Play Control by going to the Start button > Programs > Accessories > Entertainment. Win 95 Users Tip

(Play Control window)
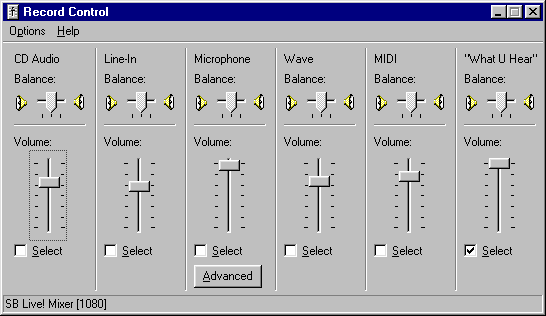
The Record Control is where you adjust the input levels when recording tracks. Win 95 Users Tip
To open the Record Control, first open the Play Control, then go to the Options menu, select Properties, then click on "Recording". Under "Show all volume controls", check the items you wish to be displayed. It is normally best to check all boxes.

(Windows Record Control mixer)
Note: You can have both the Record Control, and the Play Control opened at the same time by opening the Play Control first, then double-clicking on the speaker icon again to open the Record Control.
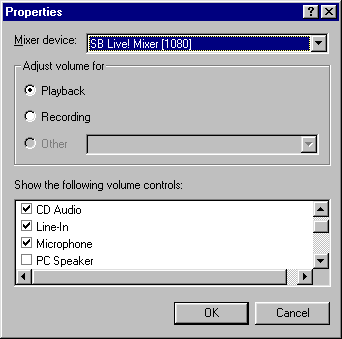
As mentioned above, you can configure other devices, or remove certain devices from being displayed in the Play Control and the Record Control. To do so, click on the Options menu, then select Properties. Under "Show all volume controls", you can choose which volume controls to display, and which to hide.

(Windows Mixer Properties box)
Hopefully now you have a little better understanding of what the volume controls are, and where you can find them. Now let’s talk a little more specifically about how these controls interact with Cakewalk when recording and playing back.
Example #1 Recording from the Microphone input ( with no external mixer):
Signal flow:
Microphone -> Mic input on card -> Windows Mixer -> Cakewalk
Did you know?: The microphone input found on some cards has a pre-amp built in, so that a microphone can be directly connected. The quality of this input is usually not very good, and the use of an external pre-amp is recommended. When using an external pre-amp, you will connect the signal to the line input of the card, not the mic input. Pre-amps can be found as stand alone units, but more commonly you will find them as part of an external mixing board.
Adjusting input levels
Let’s say you plan to record a vocal track into Cakewalk while listening to the instrument tracks that you have already recorded. You first must adjust the input volume. You do this from within the Record Control by selecting the Microphone input, then sliding the fader up or down to adjust the input. If it’s too low, you will hear noise, and if it’s too high you will hear distortion. But how do you know if it’s too low, or too high? Since the Windows Volume Control does not have any input meters, you can use Cakewalk’s Console View to see where your input signal level is.
|
|
(Cakewalk's Channel Meter in the Console View, used to see input level when recording) | After you set up a track in Cakewalk to record your vocal, by selecting the audio input of your card as the Source for the track and pressing the record Arm button for the track, a meter will appear for that track in the Console View.
Note: For specific instructions on setting up a track in Cakewalk to record audio, see the Cakewalk User’s Guide or Help File. If you have set up the Record Control correctly, you will see the level of the meter changing when you sing into the mic. Test the mic by singing at the loudness and distance from the mic you will be using once the file is actually recording. If the meter for the track is overloading, lower the Microphone input by moving the fader down in the Record Control. If the meter is not even reaching –12 on the loudest vocal parts, then raise the fader. |
Now that your input level is set for the microphone, it’s important that you can hear the other tracks, and that you can hear yourself while you’re recording.
Adjusting playback levels
The overall volume of your audio tracks that you have previously recorded in Cakewalk, is controlled in the Play Control. Adjust playback level by moving the fader called "Wave" or "Direct Sound". Win 95 Users Tip
If you also have MIDI tracks in your song, set the overall volume of them by adjusting the "MIDI" fader in the Play Control. (This assumes that you’re using your sound card’s built-in synthesizer to play your MIDI tracks, and not any external MIDI keyboards or modules).
Useful Tip: It's important that the relationship in volume between both audio and MIDI tracks stay the same. By keeping both the "Wave/Direct Sound" and "MIDI" faders at full volume all the time, your songs will always sound the way you intended. Use the main "Play Control" or "Volume Control" fader in the Play Control window to adjust the overall loudness of your speakers.
Adjusting Monitor levels
Now that you have set the input level of your microphone and the playback volume of your audio and MIDI tracks, you will now want to adjust the volume of the vocal that you are recording while you record. Don’t get this confused with the microphone input level that we’ve already set, we don’t want to change that. We want to adjust the volume of your voice, so you can hear yourself while recording. This is referred to as the "Monitor level".
Did you know? The Monitor level is just the volume the musician hears so they can be comfortable while recording, or playing live. Commonly, each musician will have their own "Monitor Mix" that’s tailored to his or her personal taste or preference. This monitor mix is only for them, and does not affect the recording levels, or what the audience hears.
The volume of your voice, while you are recording, is adjusted in the Play Control. Use the Microphone fader in the Play Control to adjust the volume, and remember, this is not affecting the input signal of the microphone, but rather just what you hear while recording.
The last adjustment to make, is the overall volume level of everything you are hearing. This is done in the Play Control by using the "Play Control" or "Volume Control" fader that’s located on the far left.
This will lower or raise the volume of everything you hear coming out of your sound card, but will not affect the level of the microphone that you set in the Record Control.
Did you know? Since you are recording a microphone signal, not only will your voice be recorded, but any other sounds in the room may also be recorded. If you are using speakers to listen to your tracks, then those tracks will also be combined with your voice and recorded on the new track. This is obviously not good. You want your vocal track to be as isolated as possible. This may or may not be a problem. If you can keep your speakers as low as possible while recording, face the mic away from the speakers, and stay close to mic while singing, the amount of bleed from the speakers may be negligible. A better idea is to use headphones while recording. Most headphones can be connected directly to the sound cards "Line Output". You may need to disconnect your speakers while recording, so you can use the headphones, then go back to the speakers when you are ready to mix the song.
Now you’re ready to record your vocal track.
Did you know? A monitor mix is very important for a musician to record a good performance. The right balance between hearing yourself, and hearing the previously recorded tracks can affect how you perform. So use the Play Control with care to get the monitor mix that’s right for you.
Useful Tip: Open both the Play Control and the Record Control, and keep them on your Taskbar. This way you can get back to them quickly by holding down the Alt key and pressing the Tab key.
After recording, play the song to hear your performance. Now that the track you just recorded is in Cakewalk as an audio track (just like any other audio track), you will not use the Microphone fader in the Play Control to adjust it’s volume. Instead, use the Volume or Velocity settings for that track in Cakewalk. Adjust the overall volume of all your audio tracks with the Wave/Direct Sound fader in the Play Control.
Cakewalk Tip: As you add more audio tracks to a file, you will eventually overload the sound card’s outputs which will result in distortion. Simply reduce the Vel+ setting for each audio track to a negative number. To keep all the audio track’s volumes relative to each other, reduce each track’s Velocity by the same amount.
SB Live Tip: Many cards come with their own volume control mixer. The Creative Labs Live! Comes with a mixer called the "Creative Surround Mixer". This mixer will do everything that the Windows Control mixer will do, plus it has a few more features that are specifically designed for the Live card. It’s up to you to decide which mixer you prefer.
The Windows Control mixer allows you to make other adjustments to your sound, not just volume. You can control the Balance (left to right panning) of your audio and MIDI, you can Mute each device to instantly cut off the volume, and even apply equalization to the overall sound to suit your own taste. Typically though, you will want to leave these setting alone, since Cakewalk can provide for better, and more accurate panning and equalization for your tracks.
Example #2 Recording from the Line Input ( with no external mixer):
Signal flow:
Guitar -> Line Input on card -> Windows Mixer -> Cakewalk
The procedure for recording from the Line input is the same as recording from the mic input used in example #1. Just substitute the references to the "Microphone" input with "Line In". One slight difference: you can connect external devices that have line level outputs directly to the line inputs of your card. These devices include cassette decks, CD players, DAT players, keyboards, and external mixers. Guitars can also be connected directly to the line input of the card if the signal is "hot" enough from the guitar. If it’s not, you will need a direct box to convert the signal to microphone level, then connect the direct box to the mic input on the card.
Conclusion
As you can see, understanding the Windows Mixer has may benefits. It allows you take advantage of your sound card's capabilities, and is necessary to using Cakewalk at it's full potential. Once comfortable with the Windows Mixer's controls, and setting up Cakewalk, recording your songs is just a few clicks away.
Win 95 Users Tips:
