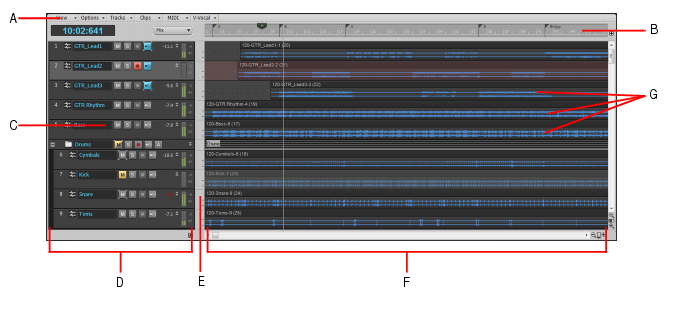
The Track view is always visible. It is the main window that you use to create, display, and work with a project. When you open a project file, the Track view is displayed for the project. Closing the Track view closes the project.The Track view is divided into several sections: toolbars (at the top), the Navigator pane, the Video Thumbnails pane, the Track pane, the Clips pane, and the Bus pane. You can change the size of the panes by dragging the vertical or horizontal splitter bars that separate them.Figure 508. The Track viewA. Track view menu B. Time ruler C. Track strips D. Track pane E. Splitter bar F. Clips pane G. ClipsYou can automate most of the controls in the Track view by recording fader movements, drawing envelopes, and creating snapshots.In addition, all of the current track’s controls, plus a few that are only available in the Console view, are contained in the Track Inspector, which is an expanded version of the current track’s controls located on the far left side of the Track view. You can hide or show the Track Inspector by pressing I on your keyboard.Figure 509. Track view menusThe View menu contains the following commands:
Navigator Show/Hide. Show or hide the Navigator pane.
Video Thumbnail Track Show/Hide. Show or hide the Video Thumbnails track. The Video Thumbnails track can be displayed even if there is no video in your project.
Auto Track Zoom. This command enables/disables Auto Zoom, which allows you to automatically enlarge the track that has focus. All other tracks are minimized. When a new track is focused, it swaps heights with the previously focused track.
Display. Use the submenu to select the desired display option:
Display Ghosted Data. Show or hide all data types, regardless of which data type is selected in a track’s Edit Filter control. All but the selected data type will be shaded, or “ghosted”. This allows you to see all data types in context while editing a specific data type.
Display Track Separators. Show or hide a horizontal line between each track in the Clips pane.
Display Clip Names. Show or hide clip names.
Display Clip Contents. Show or hide a graphical depiction of the audio or MIDI data that the track contains, including automation data.
Show Audio Scale. Show or hide the Audio Scale Ruler in the splitter bar between the Clips pane and the Track pane.
Maximize Waveform Height. Show or hide clip headers. When this option is enabled, waveforms and MIDI data span the full height of clips.
Vertical Grid Lines. Show or hide vertical grid lines in the Clips pane that are one measure apart. Use the submenu to specify how the vertical lines should display.
■ None. Vertical grid lines are not displayed.
■ Behind Clips. Vertical grid lines are displayed, but clips will draw on top of them, so clip contents will not be obstructed.
■ In Front of Clips. Vertical grid lines are displayed and drawn on top of clips, always visible.
Fit Tracks and Buses to Window. Adjust the vertical track heights to fit all tracks in your project in the Track view.
Fit Project to Window. Fit the entire project, or as many tracks as possible, into the Track view.
Fit MIDI Content. Fit all displayed MIDI content into the visible area of the Inline Piano Roll view.
MIDI Microscope. Activate Piano Roll Microscope mode. When Microscope mode is enabled, a transparent rounded square centered on the mouse cursor shows a zoomed in region of the Piano Roll data underneath it.
View Undo. Returns the Track view to the previous zoom level (undo zoom).
View Redo. Negate the last View Undo command (redo zoom).The Options menu contains the following commands:
Auto crossfade. Enable or disable automatic crossfades.
Crossfade Type. Specify default fade in, fade out and crossfade curve types.
Click Behavior. Use the submenu to specify the behavior when clicking in the Clips pane:
Left Click Sets Now. Set the Now Time by left-clicking a location in the Clips pane.
Right Click Sets Now. Set the Now Time by right-clicking a location in the Clips pane.
Left Click Locks Scroll. Prevent the Clips pane from scrolling horizontally during playback while you edit data. This allows you to focus on the edit location without worrying that the screen will eventually scroll away from the edit location. When you are done with the edit and want the Clips pane to scroll again during playback, click in the background of the Clips pane to clear auto scroll lock.
Double-Click. Use the submenu to specify what happens when you double-click a clip:
■
■
■
■
■ MIDI Clips > Inline Piano Roll View. Open the Inline Piano Roll view when you double-click a MIDI clip.
■
■ Audio Clips > Loop Construction View. Open the Loop Construction view when you double-click an audio clip.
Meter options. Use the submenu to specify options for track playback meters, track record meters and bus meters.
Drag and Drop Options. Open the Drag and Drop Options dialog box, which lets you control how clips behave when you drag them.
Mouse Wheel Zoom Options. Open the Mouse Wheel Zoom Options dialog box, which lets you specify the mouse zoom behavior.
Select Track Envelopes With Selected Clips. Selecting a clip will also select any overlapping track envelopes.
On Stop, Rewind to Now Marker. The Now Time jumps back to the Now Time Marker whenever playback stops.
Set Now Time With Full Restart. When you change the Now Time during playback, the Transport comes to a full stop, and then restarts playback. This stops the sound for a brief moment, but makes synchronization (especially with video) more robust.
Stop at Project End. Playback will automatically stop after the last event in the project is reached. When this option is disabled, playback will continue beyond the end of the project and playback can also be started in an empty project.The Tracks menu contains the following commands:
Make Instrument Track. If an existing audio track and MIDI track are assigned to the same software instrument, this command converts the two tracks into a single instrument track (only available for MIDI tracks).
Split Instrument Track. Split an instrument track into separate audio and MIDI tracks. The audio and MIDI tracks will remain assigned to the same software instrument (only available for Instrument tracks).
Bounce to Track(s). Combine one or more audio tracks into a submix.
Clone Track(s). Copy the selected track(s). You can choose to include events, properties, sends, and/or effects in the copied track(s), and specify a destination.
Delete Track(s). Delete the selected track(s), including all its track properties and all its clips and events. SONAR does not put deleted information on the Clipboard for later copying.
Wipe Track(s). Delete track contents but leave track properties intact. SONAR does not put wiped information on the Clipboard for later copying.
Copy Track Name(s) to Clip Name(s). Copy track names to clips in corresponding tracks.
Show All Tracks and Buses. Show all tracks in the project.
Hide Track(s). Hide all selected tracks. To display them again, select Tracks > Track Manager or press H on your keyboard to open the Track Manager dialog box.
Track Manager. Open the Track Manager dialog box.
Sort Tracks. Open the Sort Tracks dialog box, which lets you sort tracks by specific criteria.
Selected Track Input Series. Open the Assign Series of Inputs dialog box, which lets you assign a series of track inputs to the selected tracks.
Selected Track Inputs. Open the Track Inputs dialog box, which lets you assign a track input to the selected tracks.
Selected Track Outputs. Open the Track Outputs dialog box, which lets you assign a track output to the selected tracks.The Clips menu contains the following commands:
Apply Trimming. Permanently delete any data from a selected clip that is hidden by a slip editing edit.
Bounce to Clip(s). Combine selected audio clips into a single clip.
Convert to Stereo. Convert any selected mono audio clip(s) to stereo.
Convert to Mono. Convert any selected stereo audio clip(s) to mono.
Fade clips. Open the Fade Selected Clips dialog box, which allows you to create or edit fades on selected clips.
Create Clip Selection Group. Place all selected clips in a new selection group.
Remove from Clip Selection Group. Remove all selected clips from any selection groups they may belong to.
Revert to Original Time Stamp. Move all selected clips back to their original SMPTE time position.
Set Snap Offset to Now Time. Set the snap offset at the Now Time. A snap offset is a value, in samples, at which the Snap Grid uses to align the clip. Clips without a snap offset always align at the very beginning of a clip.
Select All Siblings. Select all clips that are linked to the selected clip.
Unlink. Open the Unlink Clips dialog.
Unlink Step Sequencer Clips. Unlink the selected step sequencer clips, allowing each clip to be edited separately from each other.
Convert MIDI Clip(s) to Step Sequencer. Convert any selected MIDI clip to a step sequencer clip.
Convert MIDI Controllers to Envelopes. Open the Convert MIDI To Shapes dialog, which lets you convert MIDI controllers into automation envelopes.The MIDI menu contains the following commands:
Show Notes. Show or hide Note events in the Inline Piano Roll view.
Show Velocity. Show or hide velocity tails in the Inline Piano Roll view.
Show/Hide Velocity Tails. Show or hide the velocity tails on MIDI notes in all tracks that are using Drum Maps.
Show Velocity on Selected Notes. Show velocities for selected Note events only. This makes it easier to see and edit velocities when many Note events are present. It also makes it easier to change the velocity for individual Note events that are stacked (such as chords).
Select Controllers Along With Notes. When enabled, selecting a Note event or a range of Note events will also automatically select any Controller events that exist within the time range of the Note event(s).
Show Controller Handles. Show or hide edit handles on controller events.
Show Clip Outlines. Show or hide clip outlines in the Inline Piano Roll view.
Hide Muted Clips. Show or hide events that live in muted clips when working in the Inline Piano Roll view.The V-Vocal menu contains the following commands:
Create V-Vocal Clip. Create a V‑Vocal clip on top of selected audio data.
Remove V-Vocal. Remove the V‑Vocal processor from the selected V‑Vocal clip.
V-Vocal Editor. Open the V‑Vocal Editor interface.
Bypass/Unbypass. Bypass or unbypass all selected V‑Vocal clips.
Bypass all V-Vocal Clips. Bypass or unbypass all V‑Vocal clips in the project.The Track pane lets you see and change the settings for each track. Selected tracks always appear in a different color. The controls for an individual track are grouped together to form that track’s track strip.
The Track pane contains meters for recording, playback, and bus levels. You can hide or show any or all of these meters, and choose many different options for the units and format of the data the meters display. See Metering.The Clips pane shows the clips in your project on a timeline that helps you visualize how your project is organized. Clips contain markings that indicate their contents. The Clips pane lets you select, move, and copy clips from place to place to change the arrangement of music and sound in your project.The Track view makes it easy to select tracks, clips, and ranges of time in a project. These are the most common selection methods:
As with most other Windows programs, you can also use the SHIFT-click and CTRL-click combinations when selecting tracks and clips. Holding the SHIFT key while you click adds tracks or clips to the current selection. Holding the CTRL key while you click lets you toggle the selection status of tracks or clips.The Bus pane contains all of your project’s buses. You display the Bus pane by clicking the Show/Hide Buses button , which is located at the bottom of the Track view.You use the buses in the Bus pane to patch in effects, control output volume and pan, and group tracks into subgroups.The Track/Bus Inspector makes it easy to adjust the current track’s (or bus’s) controls, because it’s a greatly expanded version of the current track’s controls that is located on the left side of the Track pane.The Navigator pane, located just above the Track pane, displays the whole length of your project so you can always see an overview of your song, and where the Now time is. The Navigator pane displays all of your project’s tracks. To show or hide the Navigator pane, click the Track view View menu and choose Navigator Show/Hide or press ALT+N. You can drag the splitter bar between the Navigator pane and the Track pane to change its height.The Navigator pane has a green rectangle in it that is an outline of what the Clips pane is currently displaying. If you drag the center of the rectangle around in the pane, it scrolls the Clips pane to the same view. You can drag any of the nodes on the rectangle to zoom the Clips pane in or out. If you click in the Navigator pane, the left border of the rectangle jumps to the spot you clicked, and scrolls the Clips pane to that spot also. If you hold down the CTRL key while you click, the Now time jumps to that spot.Figure 510. The Navigator paneSONAR has a special Accessibility Mode which can be helpful for vision impaired users when working with screen readers (Window-Eyes, JAWS, etc.). The Accessibility Mode is enabled by adding a key to the Windows Registry (WARNING: only do this if you are comfortable with editing the Windows registry; you may want to back up the registry first), and allows screen readers to receive various information from SONAR that may otherwise not be displayed on the screen (names, values, etc.).
Tip - Searching Documentation
Tip: To search for a specific topic, type your search query in the Search Cakewalk.com field at the top right of this page.
When the search results appear, click which product's documentation you would like to search to filter the search results further.
Note - Using Offline Help
Note: If you prefer to always use offline Help, go to Edit > Preferences > File > Advanced in your Cakewalk software and select Always Use Offline Help.
If you are not connected to the internet, your Cakewalk software will default to showing offline help until an internet connection becomes available.