Cakewalk // Documentation // SONAR // Preparing audio for distribution
Table of Contents Previous Next Index

Mixing ► Preparing audio for distribution

The File > Export Audio command exports your project as a new file or files that you can burn to a CD, or distribute via the Web or email. In addition, SONAR Platinum and Professional allow you to export surround-encoded files (see Exporting surround mixes). The following export formats are supported:
OMF (File > Export > OMF)
To use the utility, start SONAR and go to Utilities > Cakewalk Ext Encoder Config, then specify the proper settings or the encoder you want to use.
4.
Choose File > Export > Audio to open the Export Audio dialog box.
7.
Choose one of the following from the Files of type drop-down list:
*
Wave. Choose this if you want to export a standard wave file, or if you’re exporting a surround project in wave format.
*
Broadcast Wave (time-stamped). Choose this if you want to create a Broadcast Wave file (see Broadcast Wave).
8.
In the Source Category field, select one of the following options:
*
Tracks. Choosing this option creates a separate file for each track that you select in the Source Buses/Tracks field.
*
Buses. Choosing this option creates a separate file for each bus that you select in the Source Buses/Tracks field.
*
Hardware Outputs. Choosing this option creates a separate file for each hardware output that you select in the Source Buses/Tracks field.
*
Entire Mix. Choosing this option creates one file for your entire mix, unless you’re exporting a surround mix with Split Mono selected in the Channel Format field.
*
Mix Recall. Choosing this option bounces each selected Mix Scene to a separate file.
9.
In the Source Buses/Tracks field, choose the buses or tracks you want to use as a source to create your mix. If you chose Tracks in the Source Category field, only tracks will show up as choices in this field.
10.
In the Channel Format field, select one of the following options:
*
Stereo. All exported tracks and clips are mixed down to a stereo file or files.
*
Mono. All exported tracks and clips are mixed down to a mono file or files.
*
Split Mono. All exported tracks and clips are mixed down to separate mono files.
*
Multichannel. All exported tracks are mixed down to a multichannel wave file or files.
13.
In the Mix Enables field, choose the elements you want to include in the mixdown. If you want to exclude muted tracks and/or include only soloed tracks, make sure Track Mute/Solo is checked.
14.
If you want to save the settings you created in the Export Audio dialog box, type a name for them in the Preset window and then click the floppy disk icon that’s next to the window.
15.
Click Export.
*
Description. A brief description of the contents of the Broadcast wave. Limited to 256 characters.
*
Originator. The author of the Broadcast wave. This information is taken from the Artist field in the Notes Browser (see Using the Notes Browser).
*
Originator Reference. A unique reference identifier created by SONAR.
*
Origination Date. The date the file was created.
*
Origination Time. The time the file was created.
*
Time Reference. The SMPTE time stamp for the beginning of broadcast wave.
4.
Choose File > Export > Audio to open the Export Audio dialog box.
7.
Choose Windows Media Advanced Streaming Format from the Files of type drop-down list.
8.
In the Source Category field, select one of the following options:
*
Tracks. Choosing this option creates a separate file for each track that you select in the Source Buses/Tracks field.
*
Buses. Choosing this option creates a separate file for each bus that you select in the Source Buses/Tracks field.
*
Hardware Outputs. Choosing this option creates a separate file for each hardware output that you select in the Source Buses/Tracks field.
*
Entire Mix. Choosing this option creates one file for your entire mix, unless you’re exporting a surround mix with Split Mono selected in the Channel Format field.
*
Mix Recall. Choosing this option bounces each selected Mix Scene to a separate file.
9.
In the Source Buses/Tracks field, choose the buses or tracks you want to use as a source to create your mix. If you chose Tracks in the Source Category field, only tracks will show up as choices in this field.
10.
In the Channel Format field, select one of the following options:
*
Stereo. All exported tracks and clips are mixed down to a stereo file or files.
*
Mono. All exported tracks and clips are mixed down to a mono file or files.
*
Split Mono. All exported tracks and clips are mixed down to separate mono files.
*
Multichannel. All exported tracks are mixed down to a multichannel WMA file or files.
13.
In the Mix Enables field, choose the elements you want to include in the mixdown. If you want to exclude muted tracks and/or include only soloed tracks, make sure Track Mute/Solo is checked.
14.
If you want to save the settings you created in the Export Audio dialog box, type a name for them in the Preset window and then click the floppy disk icon that’s next to the window.
15.
Click Export.
The Windows Media Format Encode Options dialog box appears.
4.
Choose File > Export > Audio to open the Export Audio dialog box.
7.
Choose MP3 from the Files of type drop-down list.
8.
In the Source Category field, select one of the following options:
*
Tracks. Choosing this option creates a separate file for each track that you select in the Source Buses/Tracks field.
*
Buses. Choosing this option creates a separate file for each bus that you select in the Source Buses/Tracks field.
*
Hardware Outputs. Choosing this option creates a separate file for each hardware output that you select in the Source Buses/Tracks field.
*
Entire Mix. Choosing this option creates one file for your entire mix.
*
Mix Recall. Choosing this option bounces each selected Mix Scene to a separate file.
9.
In the Source Buses/Tracks field, choose the buses or tracks you want to use as a source to create your mix. If you chose Tracks in the Source Category field, only tracks will show up as choices in this field.
10.
In the Channel Format field, select one of the following options:
*
Stereo. All exported tracks and clips are mixed down to a stereo file or files.
*
Mono. All exported tracks and clips are mixed down to a mono file or files.
*
Split Mono. All exported tracks and clips are mixed down to separate mono files.
12.
In the Bit Depth field, select 16. If your source file is 24 and you export to 16, you lose some sound definition, but you get some of it back if the Dithering option is on in the Edit > Preferences > Audio - Playback and Recording dialog box (see Dithering for more information).
13.
In the Mix Enables field, choose the elements you want to include in the mixdown. If you want to exclude muted tracks and/or include only soloed tracks, make sure Track Mute/Solo is checked.
14.
If you want to save the settings you created in the Export Audio dialog box, type a name for them in the Preset window and then click the floppy disk icon that’s next to the window.
15.
Click Export.
The Cakewalk MP3 Encoder dialog box appears.
2.
Choose File > Export > Audio to open the Export Audio dialog box.
4.
In the Source Category field, select Clips.
5.
In the File name field, specify the desired file name, or accept the default [Clips] setting. By default, SONAR uses the existing clip names as the exported file names. When exporting multiple clips, the following file naming conventions are used:
*
If no clip name is assigned, the exported file will be named Untitled Clip. For example, Untitled Clip.wav.
*
If you specify a name in the File name field, SONAR will use that as a prefix followed by a comma and the actual clip name. For example: Myclips, Record1.wav.
6.
Choose the desired file format from the Files of type drop-down list:
7.
In the Mix Enables section, select the elements you want to include in the export.
8.
If you want to save the settings you created in the Export Audio dialog box, type a name for them in the Preset window and then click the floppy disk icon that’s next to the window.
9.
Click Export.
You can tell SONAR to automatically add a specific amount of time to each exported clip. To specify how much time to add to all exported clips to accommodate effect tails, go to Edit > Preferences > File - Audio Data and specify the global Clip Tail Duration N Seconds value. Set the value high enough to allow for any delay or reverb or other effect that you may have patched into a track.
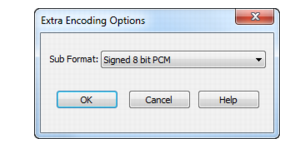
After clicking the Export button, an additional dialog box will appear showing Extra Encoding Options. These options typically determine the bit depth, endian-ness (the byte ordering in memory used to represent the data), and an encoding type within the major file format.
Figure 405. The Extra Encoding Options dialog box.
Copyright © 2024 Cakewalk, Inc. All rights reserved
Sitemap | Privacy Policy | Legal