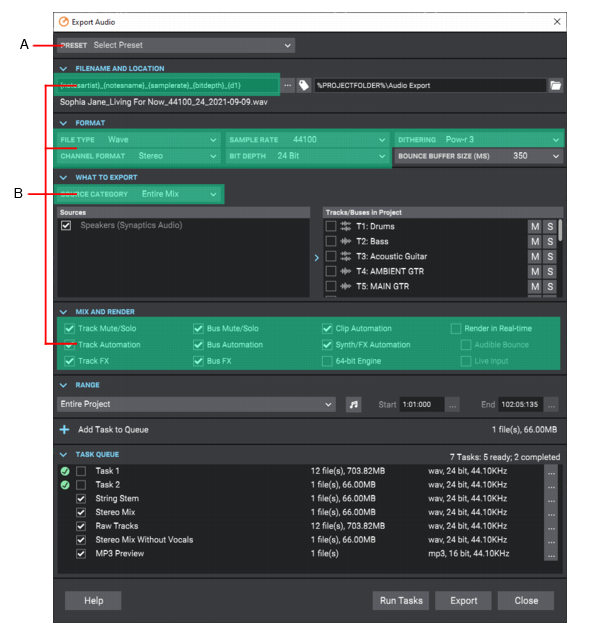
Select File > Export > Audio to open the Export Audio dialog box. This command lets you export your projects as Wave, MP3 files, and other types of formats.
Note: If you select any data in your project, only that data is included when you choose to export audio. Alternatively, you can mute tracks or buses you don’t want to include in the mixdown, and then check Track Mute/Solo or Bus Mute/Solo in the Mix and Render section so that Sonar uses that information as a guide when picking what data to include in the exported file. If a project is using any effects that add a “tail” to the end of an audio track, such as reverb or delay, then you should make sure that you select extra time in the Time Ruler at the end of the current selection before using the File > Export Audio command. This ensures that the “tail” is included in the audio mixdown.The Export Audio dialog box has the following settings:
Preset. You can create presets of export settings.
To save a preset, give your preset a new name, then press ENTER or click the Save Preset button .
To delete the selected preset, click the Delete Preset button .
Format settings (except Bounce Buffer Size)
What to Export source category
Mix and Render settingsFigure 587. Highlighted fields are stored in export presets.A. Presets B. Settings stored in presets
File Name. Enter a name for the file you are creating. You can use special file name tokens to build the file name. For details, see Using export filename tags and presets.
You can save your custom export filename format as a preset in the filename tag panel. To open the filename tag panel, click the Build Filename Using Tags button . For details, see Saving filename presets.
Choose Export File Name . Select a specific file to overwrite. The Location field automatically inherits the folder path.
Build File Name Using Tags . Open the filename tags pop-up panel, which lets you build the filename by using various tags that automatically extract the corresponding information (such as the project name, artist, sample rate, bit depth, current date or time, etc.) from a project and adds it to the resulting filename. For details, see Using export filename tags and presets.
Table 98. File name tokens
Table 99. File name tokens
Folder Location. Shows the export folder path.
When you first open the Export Audio dialog box, the folder location is set to the default location as specified in Edit > Preferences > File - Folder Locations under Export Audio Files. The default is \Audio Exports under the current project directory, where the current project folder is indicated by the %PROJECTFOLDER% environment variable.
Choose Export Location . Browse your available drives to choose a different directory.
To change the global export location for all projects, go to Edit > Preferences > File - Folder Locations and change the Export Audio Files path.
Tip: If you change the folder path in the Export Audio dialog box, you can restore the %PROJECTFOLDER%\Audio Export path by holding down the CTRL key and clicking the Choose Export Location button.
File Type. Select from one of the following export formats:
Wave. The standard digital audio format used under Windows and for CDs, with a file extension of .wav.
Broadcast Wave (time-stamped). A wave file with the following embedded information:
Description. A brief description of the contents of the Broadcast wave. Limited to 256 characters.
Originator. The author of the Broadcast wave. This information is taken from the Artist field in the Notes Browser (see Using the Notes Browser).
Originator Reference. A unique reference identifier created by Sonar.
Origination Date. The date the file was created.
Origination Time. The time the file was created.
Time Reference. The SMPTE time stamp for the beginning of broadcast wave.
Windows Media Advanced Streaming Format. The Microsoft Corporation's compressed audio format, with the file extension of .wma. If you choose Windows Media Advanced Streaming Format you will be prompted for more information about the file by the Microsoft Audio Encode Options dialog box.
MP3. The mpeg-3 format, with the file extension .mp3.
DSD - DSF. The Direct Stream Digital format, with the file extension .dsf.
DSD - DFF. The Direct Stream Digital format, with the file extension .dff.
AIFF. The Audio Interchange File format, with the file extension .aiff.
AU. The Sun/NeXT format, with the file extension .au.
CAF. The Apple Core Audio format, with the file extension .caf.
FLAC. The FLAC (Free Lossless Audio Codec) format, with the file extension .flac.
OGG. The Ogg Vorbis Audio format, with the file extension .oga.
RAW. The RAW (header-less) format, with the file extension .raw.
RF64. The RIFF 64 format, with the file extension .rf64.
SD2. The Sound Designer II format, with the file extension .sd2.
W64. The SonicFoundry WAVE 64 format, with the file extension .w64.
WAV. [uses Libsndfile wave exporter] The standard digital audio format used under Windows and for CD’s, with a file extension of .wav.
WAVEX. The Wave Format Extensible format, with the file extension .wav.
YouTube Publish. Share a CD quality version of your song on YouTube. This format will result in a larger file size and may take longer to upload.
Channel Format. Specify whether to export stereo files, mono files or split mono files. Select from one of the following options:
Follow Source. Create stereo files for stereo tracks, or mono files for mono tracks.
Mono. Creates a separate mono file for each track or bus selected in the Sources list.
Stereo. Creates a separate stereo file for each track or bus selected in the Sources list.
Split Mono. Creates separate mono files for each track or bus selected in the Sources list. Stereo tracks/buses are split into separate files for the left and right channels. If the selected bus is a surround bus, the selected bus produces as many mono files as the bus has channels.
Multichannel. All exported tracks in a Surround project are mixed down to a multichannel file containing the number of channels listed in Edit > Preferences > Project - Surround.
Sample Rate. Set the sample rate for the file(s).
Bit Depth. Set the bit depth for the file(s).
Tip: If you are exporting to a file with a different bit depth from the one in your project, enable Dithering to prevent undesirable quantization noise or harmonic distortion.
Decimation Filter (DSD format only). The decimation filter produces improved sound quality with DSD export, and is only available when exporting to a DSD format. The filter supports four decimation modes:
Dithering. Choose which dithering algorithm to use when exporting to a file with a different bit depth from the one in your project. Whenever an audio signal is converted from a higher-bit resolution to a lower resolution, it is necessary to apply dither to avoid introducing undesirable quantization noise or harmonic distortion into the signal. For more information see Dithering. Sonar offers five kinds of dithering:
None. No dithering is applied.
Rectangular. Essentially white noise, no noise shaping. Advantages: least CPU-intensive, lowest signal-to-noise ratio, preferable to shaped dither when successive dithering can occur (e.g. bouncing, freezing). Disadvantages: suffers from intermodulation distortion, higher perceived loudness than Pow-r dither.
Triangular. Higher level than rectangular, no noise shaping. Advantages: low CPU-intensive dither, superior to Rectangular as it does not suffer from modulation noise effects. Preferable to shaped (Pow-r) dither when successive dithering can occur (e.g. bouncing, freezing). Disadvantages: higher perceived loudness than Pow-r dither.
Pow-r 1. Noise-shaped dither. Advantages: less CPU-intensive than Pow-r types 2 and 3, lower perceived loudness than Rectangular or Triangular. Disadvantages: less noise shaping than Pow-r types 2 and 3, not recommended for operations where dither will be applied successively (e.g. bounce and freeze).
Pow-r 2. Noise-shaped dither. Advantages: lowest perceived loudness, highest quality settings, recommended for audio export. Disadvantages: highest CPU-intensive settings, not recommended for operations where dither will be applied successively (e.g. bounce and freeze).
Pow-r 3. Same as Pow-r 2 except most CPU-intensive and transparent of all choices.
Bounce Buffer Size (ms). Controls the buffer size for export independently of the playback latency buffer size when Render in Real-time is disabled. The default settings uses the current playback buffer size (max size is 200 msec). A larger buffer size can speed up the export process in large projects by allowing the CPU to process data more efficiently, but will use more memory. The playback latency buffer size is used when Render in Real-time is enabled.
Source Category. Specify which audio sources to export:
Tracks. Creates a separate file (or group of files if Split Mono is selected under Channel Format) for each track that you select in the Sources list. The audio is captured at each of the selected track outputs, before it reaches any buses.
4 Having a project selection means that there is a time selection. If tracks are selected in the project, then all the tracks selected in the Sources list will be exported at exactly the length of the selection. All exported files will be the same duration.
Tracks Through Entire Mix. Exports individual tracks, including all downstream bus effects and automation, as heard through the main output. The result is the same as if you solo one track at a time during export.
Track Folders. Creates a separate file (or group of files if Split Mono is selected under Channel Format) for each track folder that you select in the Sources list, as heard through the main output. The result is the same as if you solo one track folder at a time during export.
Buses. Creates a separate file (or group of files if Split Mono is selected under Channel Format) for each bus that you select in the Sources list. The audio is captured at each of the selected bus outputs.
Hardware Outputs. Creates a separate file (or group of files if Split Mono is selected under Channel Format) for each hardware output that you select in the Sources list. The audio is captured at each of the selected hardware outputs.
Entire Mix. Creates a single file (or group of files if Split Mono is selected under Channel Format) as heard through the main output.
Clips. Creates a separate file (or group of files if Split Mono is selected under Channel Format) for each clip in the current project selection.
Mix Recall. Creates a separate file (or group of files if Split Mono is selected under Channel Format) for each Mix Recall scene that you select in the Sources list, as heard through the main output.
Arrangements. Creates a separate file (or group of files if Split Mono is selected under Channel Format) for each arrangement that you select in the Sources list.
Arranger Sections. Creates a separate file (or group of files if Split Mono is selected under Channel Format) for each Arranger section that you select in the Sources list, as heard through the main output.
Sources. Select the audio source(s) that you want to export, based on the Source Category.
Note: Selection within the Sources list is there only to help you check or uncheck multiple items at once. It has no bearing on what will be exported. Only the checked source items will be exported.
Search. The search filter lets you search for a particular source should you have a large number of sources to search through. The search filter is available for all source categories except Hardware Outputs, Entire Mix, and Clips.
Show/Hide Project Selection / . Show/hide the current project selection.
Tracks/Buses in Project. Export works on the current project selection. The Tracks/Buses in Project list allows you to modify the current track selection and the mute and solo status of each track and bus, without exiting the Export Audio dialog box. This is especially convenient if you if you want to create several tasks, each with a different selection, or if you want to export multiple stems. Simply solo the tracks that you want to include in the stem, then add as a new task. Note:
Changing the project selection changes which Sources items are available.When all Mix and Render options are selected, the export will sound the same as playback. You can check or uncheck each of the following items to include or exclude them from the exported audio file(s):
Track Mute/Solo. When enabled, tracks that are currently muted are not mixed down, and if any tracks are soloed, only those tracks are included in the mixdown.
Track Automation. Include track automation in the mixdown, When disabled, any volume and pan automation, including initial volume and pan settings, is ignored when creating the new file(s). The amplitude of the raw data in the tracks is used, and the pan is C, or centered.
Track FX. Include track effects in the mixdown. When disabled, any effects patched into various tracks’ patch points, including any plug-in synthesizers patched into track fx patch points, are ignored when creating the new file(s).
Bus Mute/Solo. When enabled, buses that are currently muted are not mixed down, and if any buses are soloed, only those buses are included in the mixdown.
Bus Automation. Include bus automation in the mixdown, When disabled, any bus automation is ignored when creating the new file(s).
Bus FX. Include bus effects in the mixdown. When disabled, any effects patched into buses, including any plug-in synthesizers patched into bus fx patch points, are ignored when creating the new file(s).
Clip Automation. Include clip automation in the mixdown, When disabled, any clip automation, including any trim settings, is ignored when creating the new file(s).
Synth/FX Automation. Include synth/FX automation in the mixdown, When disabled, any synth and effect automation is ignored when creating the new file(s).
64-bit Engine. Enable the 64-bit mix engine temporarily during mixdown if you don’t have 64-bit Double Precision Engine selected in Edit > Preferences > Audio - Driver Settings. This produces a higher-quality mixdown without taxing your CPU during the rest of your session. Disable if you use plug-ins that do not support 64-bit processing.
Render in Real-time. When enabled, mixdown is performed in real-time by actually playing back the project in similar fashion to standard playback. All audio hardware inputs and outputs are active in order to allow I/O to external hardware inserts. Enable if you use effects or synths that only work in real-time. When disabled, all hardware outputs are temporarily disabled and the mixdown is performed silently as fast as your computer allows. There is no sonic degradation by performing a fast mixdown since it uses the same operation that is performed during normal playback.
Note: You must enable Render in Real-time if you use the External Insert plug-in. Since the External Insert plug-in is typically used to receive audio from external hardware, Sonar’s audio output must be sent to the external hardware in real-time.
Audible Bounce. When Render in Real-time is enabled, the real-time render operation can be performed either silently or audibly. When Audible Bounce is enabled, you can hear the output of the mixdown. When disabled, no audio output will be heard during the mixdown process.
Caution: Depending on the gainstages used in the project and the mixdown options selected–such as bouncing with Source Category assigned to Tracks, or with mute/solo or automation disabled under Mix and Render, –the output may be louder or softer than during normal playback. Please be sure to turn down the master output level before using real-time audible bounce under these scenarios to avoid the possibility of speaker damage.
Live Input. When Render in Real-time is enabled, enable Live Input to include any live audio input in the mixdown, such as external hardware synths or effects. For details, see Real-time bounce.
Include Project Preview. Save a project preview file that allows you to preview the project in the Quick Start screen without having to open the project. For details, see Creating a project preview file and Previewing a project.
Range. Specify the time range to be exported:
Entire Project. The entire length of the project.
Time Selection. A specified time selection. The Start and End edit boxes allow you to manually enter the start and end times of the export range. Click the / button to toggle between musical (Measures:Beats:Ticks) and absolute (Hours:Minutes:Seconds:Frames) time. Click the buttons to choose a time based on defined project landmarks, such as the beginning of the project, the now time, or marker locations.
Set Time Selection to Loop Range. Set the selection start and end times to the Loop From and Loop Thru times.
Set Time Selection to Punch Range. Set the selection start and end times to the Punch In and Punch Out times.
Add Task to Queue . Create a new task from the current export settings and add it to the queue.
Number of files. Shows the number of files that will be exported.
Task list. The task list shows all queued tasks in the current project. The task queue is per project and is saved with the project.
Tasks are automatically unchecked on successful completion and show a icon. Canceled tasks show a icon. To reset a task so it will execute again the next time you click Run Tasks, simply check the task.
Task menu . Click a task’s menu button to access the following commands:
Rename. Rename the task.
Delete. Remove the task from the queue.
Update Task with Current Settings. Update the task with the current export settings. All other tasks in the task queue remain unchanged.
Recall Task Settings. The task’s settings are recalled in the Export Audio dialog box. Alternatively, double-click the task.
Open Export Location. Open Windows Explorer at the location of the exported audio files.
Run Tasks. Export all selected tasks in the queue. The tasks in the queue are exported one after another.
While the queue is running, the Run Tasks button changes to a Cancel button, which allows you to cancel the in-progress queue export at any time. Any canceled tasks show a “Canceled” icon .
Export. Export a single job with the current settings.
Tip - Searching Documentation
Tip: To search for a specific topic, type your search query in the Search Cakewalk.com field at the top right of this page.
When the search results appear, click which product's documentation you would like to search to filter the search results further.
Note - Using Offline Help
Note: If you prefer to always use offline Help, go to Edit > Preferences > File > Advanced in your Cakewalk software and select Always Use Offline Help.
If you are not connected to the internet, your Cakewalk software will default to showing offline help until an internet connection becomes available.